Every holiday season, I find myself drawn to recipes that bring a little extra sparkle and joy to my kitchen. There’s something so magical about homemade treats, especially when they look as festive as they taste. This year, I’m absolutely smitten with these adorable Meringue Trees: Easy, 5-Ingredient Recipe – they’re light, airy, and just melt in your mouth. They’ve quickly become a new favorite for adding a whimsical touch to our holiday dessert table!
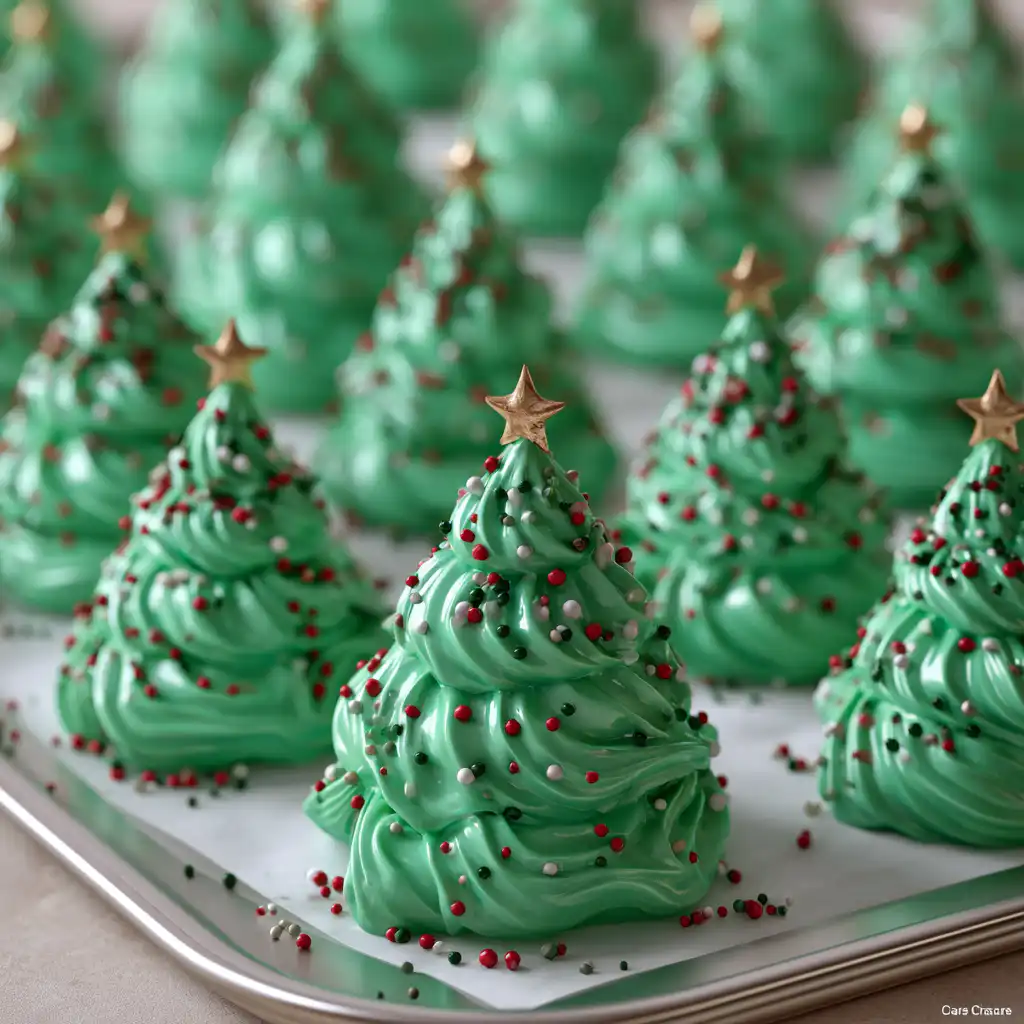
Why You’ll Love This Meringue Trees: Easy, 5-Ingredient Recipe
- They’re incredibly light and airy, with a delightful crunch that gives way to a soft, chewy center.
- You only need 5 simple ingredients, most of which you probably already have in your pantry!
- They’re surprisingly easy to make, even if you’re new to baking.
- Perfect for holiday parties, cookie exchanges, or just a fun baking project with the family.
Ingredients You’ll Need
- Large Egg Whites: Make sure they are at room temperature. This helps them whip up to their fullest volume, giving you those beautiful, fluffy meringues.
- Cream of Tartar: This is optional, but I highly recommend it! It’s a secret weapon that helps stabilize the egg whites, ensuring your meringue holds its shape and gets super stiff peaks.
- Superfine Caster or Granulated Sugar: Granulated sugar works perfectly fine, but superfine caster sugar dissolves a little more quickly, giving you an even smoother meringue.
- Vanilla or Almond Extract: Either one adds a lovely warmth and depth of flavor. Vanilla is classic, but almond gives a wonderful, slightly nutty note.
- Green Gel Food Coloring: Gel coloring is best here! It’s super concentrated, so you get vibrant color without adding too much liquid, which can thin out your meringue.
How to Make Meringue Trees: Easy, 5-Ingredient Recipe Step by Step
First things first, you’ll want to get your oven preheating to a super low 200°F (93°C) and line a baking sheet. Meringues love a slow, gentle bake! Before you even think about the egg whites, double-check your mixing bowl and whisk attachment. Any trace of grease can be a meringue disaster, so wipe everything down with a little vinegar if you’re not sure. This step is crucial for perfect, fluffy meringues!
Now for the fun part: whipping those egg whites! Start them on medium speed until they’re nice and bubbly. Then, add your cream of tartar and keep whipping until you see soft peaks forming – this means when you lift the whisk, the peaks gently flop over. This is where the magic starts!
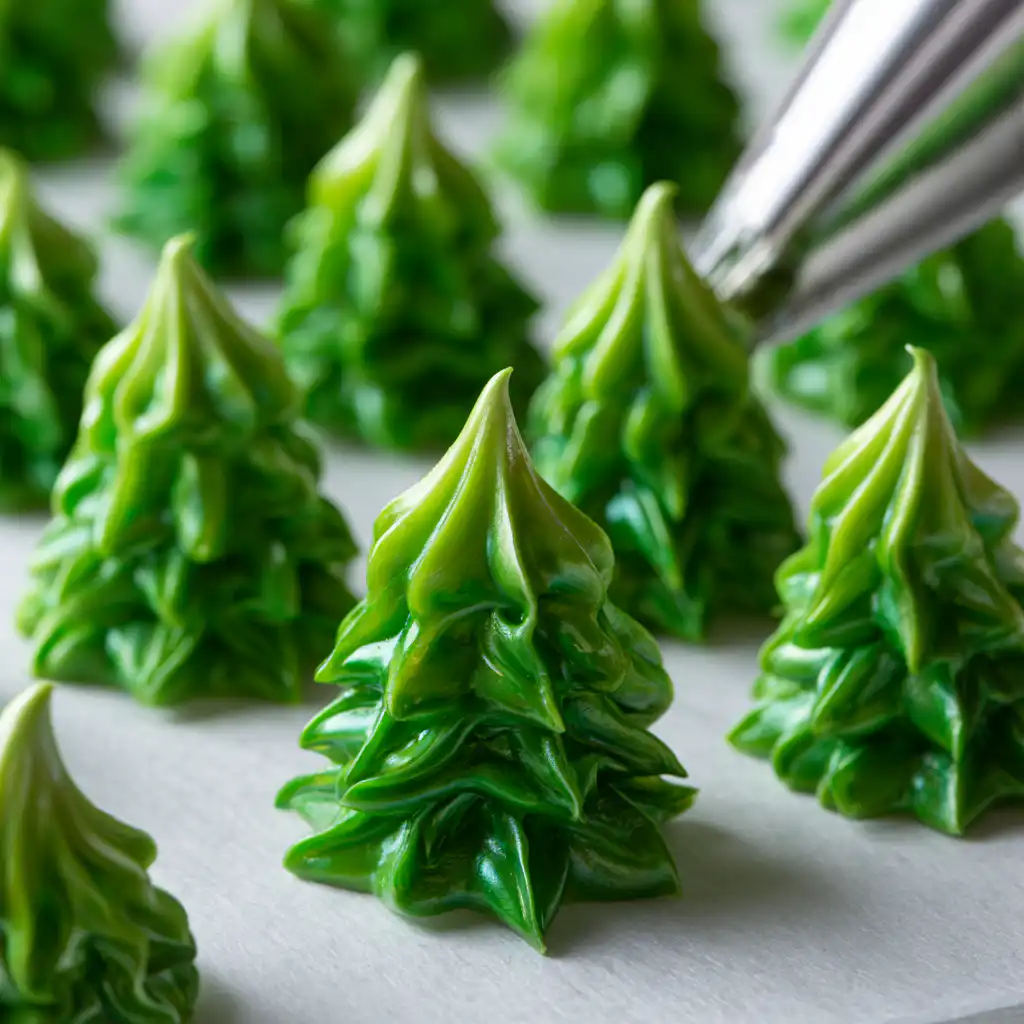
Next, slowly, slowly add your sugar, a little at a time, while the mixer is still running on medium-low. Once all the sugar is in, crank up the speed to medium-high. Keep mixing until you have stiff, glossy peaks. This means when you lift the whisk, the peaks stand up straight and hold their shape. Stir in your extract and green food coloring when the meringue gets close to reaching stiff peaks. Don’t worry if the color isn’t super dark yet; we’ll add more directly to the piping bag for that cool striped effect!
My Top Tips for Success
- I always make sure my egg whites are at room temperature. It helps them whip up much fuller and faster!
- In my experience, using a gel food coloring is a game-changer. It gives you vibrant color without adding extra liquid that can deflate your meringue.
- Trust me on this one: patience is key when adding the sugar. Gradually incorporating it ensures it dissolves properly, giving you a smooth, stable meringue.
- Don’t rush the baking and cooling process. The low temperature and gradual cooling in the oven prevent cracks and ensure a perfectly crisp exterior.
- I like to prepare my piping bag with the green streaks before filling it. This gives those beautiful, festive tree patterns.
Common Mistakes to Avoid
- Greasy Equipment: Even a tiny bit of grease on your bowl or whisk can prevent egg whites from whipping properly. Always clean your equipment thoroughly with vinegar before starting.
- Adding Sugar Too Quickly: Dumping all the sugar in at once can make your meringue grainy or prevent it from reaching stiff peaks. Add it slowly, a spoonful at a time.
- Over-Whipping: While you want stiff peaks, over-whipping can make the meringue dry and brittle. Stop as soon as stiff, glossy peaks form.
- Opening the Oven Door: Resist the urge to peek during the baking and cooling process! Sudden temperature changes can cause your meringues to crack.
- Skipping the Gradual Cool Down: Letting the meringues cool in the turned-off oven is essential. It helps them dry out completely and prevents them from becoming sticky or chewy.
How to Store Meringue Trees: Easy, 5-Ingredient Recipe
- Airtight Container: Store completely cooled meringues in an airtight container at room temperature.
- Duration: They will stay fresh and crisp for up to two weeks.
- Avoid Humidity: Meringues are very sensitive to moisture, so keep them away from humid environments.
Frequently Asked Questions
Can I make these Meringue Trees ahead of time?
Absolutely! Meringues are fantastic for making in advance. They stay fresh for up to two weeks when stored properly in an airtight container at room temperature.
Why did my meringues crack?
Meringues often crack due to sudden temperature changes. Make sure your oven temperature is low and stable, and always allow them to cool gradually inside the turned-off oven.
My meringues are sticky, what went wrong?
Sticky meringues usually mean they haven’t dried out completely. They might need more time in the oven, or they were exposed to too much humidity after baking.
Can I use liquid food coloring?
It’s best to stick with gel food coloring. Liquid food coloring can add too much moisture to the meringue, potentially making it unstable and preventing it from whipping up correctly.
Do I really need cream of tartar?
While optional, cream of tartar acts as a stabilizer for the egg whites. It helps them whip faster, reach higher volume, and maintain their structure, leading to a more consistent and successful meringue.
I hope these Meringue Trees: Easy, 5-Ingredient Recipe bring as much festive cheer and deliciousness to your home as they do to mine. They’re such a simple way to create something truly special for the holidays. If you whip up a batch, I’d absolutely love to hear how they turned out!
PrintMeringue Trees: Easy, 5-Ingredient Recipe

Light, airy, and festive meringue trees perfect for holiday baking, made with just 5 simple ingredients.
- Prep Time: 20
- Cook Time: 150
- Total Time: 170
- Yield: 24-30 trees
- Category: Dessert
- Method: Baking
- Cuisine: American
- Diet: Vegetarian
Ingredients
- 4 large egg whites, room temperature 120g
- 1/2 tsp cream of tartar – optional
- 1 cup superfine caster or granulated sugar 200g
- 1/2 tsp vanilla or almond extract – optional 3g
- green gel food coloring
- nonpareil sprinkles
- powdered sugar – for dusting
Instructions
- Preheat your oven to 200°F (93°C).
- Line a large baking sheet with parchment paper or a silicone mat.
- Set the lined baking sheet aside.
- Ensure your whisk attachment and mixing bowl are completely free of grease.
- If you see any grease, moisten a paper towel with vinegar and wipe the bowl and whisk.
- Add the 4 large, room-temperature egg whites into the bowl of a stand mixer fitted with a whisk attachment.
- Mix the egg whites on medium speed until the surface is covered in small bubbles.
- Add 1/2 teaspoon of cream of tartar (if using).
- Continue to mix until the egg whites reach the soft peak stage.
- This means visible tracks will be left, and peaks will gently flop over when the whisk is lifted.
- Gradually mix in 1 cup of granulated sugar over a few minutes while the mixer is on medium-low speed.
- Increase the mixing speed to medium-high (setting 6 on a KitchenAid).
- When the meringue is close to reaching stiff peaks, add 1/2 teaspoon of vanilla or almond extract (if using).
- Add a squirt of green gel food coloring.
- Continue mixing until stiff, glossy peaks form.
- Scrape around the sides of the bowl to ensure the meringue is evenly colored.
- Fit a large piping bag with an open or closed star piping tip (like a Wilton 1M).
- Do not use a piping tip larger than Wilton 1M.
- Use a small paintbrush to brush green gel food coloring on the inside of the piping tip and piping bag.
- Scoop the prepared meringue into the large piping bag.
- Seal the top of the piping bag with a rubber band or clip.
- Pipe little trees onto the prepared baking sheet by piping three dollops of meringue on top of each other.
- Pipe the trees about 1 inch apart, as they do not spread during baking.
- Ideally, fit all trees onto one tray due to the long baking and cooling time.
- Toss nonpareil sprinkles over the piped meringues to resemble Christmas ornaments.
- Add a star sprinkle to the top of each tree if desired.
- Bake the tray on the middle rack of your oven for 90 minutes.
- After 90 minutes, turn the oven off.
- Let the trees sit in the oven for another hour to cool gradually.
- This gradual cooling helps prevent them from cracking.
- At this point, the trees should be fully cooked and feel dry to the touch.
- If they still seem wet or moist, leave them in the turned-off oven for an additional half hour.
- Remove the tray from the oven.
- Allow the meringues to cool completely to room temperature.
- Lightly dust the cooled meringues with powdered sugar using a fine sieve to create a snow-like effect.
- Enjoy your meringue trees!
Notes
Ensure all your equipment is grease-free for best results.
Always add sugar gradually to achieve a stable meringue.
Do not open the oven door during baking or cooling to prevent cracking.
Store cooled meringues in an airtight container at room temperature for up to two weeks.


![Easy Southern Peach Cobbler [with Canned Peaches]](https://theflakytruth.com/wp-content/uploads/2026/08/cmswa1vwj00lb102k5xxpcxh8-hero-300x300.webp)